Series: Persona 5: Dancing in Starlight
Costume Creation: I bought the base outfit, shoes, and wig from AliExpress and made the headphones, shirt, and gloves from scratch. The red fabric is a 4-way stretch heavy knit. The headphones were old ones that I already had and just painted over.
Cost: $90
Created: September 2020
Work time: 8 hours
Status: Active
Worn at: None Yet
Photographers: Erik Parades Photography
Series: Design inspired by Sheik from Legend of Zelda: Ocarina of Time
Costume Creation: Dark green and black 4 way stretch knit fabric the shirt, and gloves. The outlining is simply white bias tape and then leftover red fabric I embroidered in by machine onto the shirt at the end. I doubled cotton lining for the shorts with a custom bridal lace along the bottom. The waist is literally a crap ton of leftover fabric wrapped around me to accentuate the hips to appear larger for an overall. The shoulder fabric is the blue brocade from the Yaya Han line at Joann's with white bias along the top and red rope tied along the bottom. The hip pieces are simply EVA foam with self-rolled 2mm craft foam glued along the edges for added dimension then coated in plasti-dip. I created my own stencil for the design. The bracelets were a similar technique where I used 2mm craft foam with 2mm craft foam rolls for the edges and hand painted the details. The cape, hood, and 2 layered skirt I used a polyester sheer off-white fabric that was simply spray dyed over a gradient for the cape and top skirt. The sandals were created from scratch using a thick lining with a heavy iron on interfacing, glued in between two pieces of 6mm foam. The wig I styled into the side braid, wrapped the bottom in 2mm foam, covered that in an off-white fabric to hide the foam look, and wrapped that in the same red threading.
Cost: $80 including wig and contacts
Designed by: Drifting by Stars
Created: February 2017
Work time: 1.5 weeks
Status: Retired
Worn at: Katsucon 2017, Colossalcon East 2017
Photographers: Yenra Photography, Theorem Productions
Series: Design inspired by Mario Kart infamous Blue Shell everyone despises.
Costume Creation: This was definitely more of a casual cosplay for me, the tailcoat was bought off of Ebay. I created the 2 Blue Shells, the headpiece and ankle pieces out of 6mm and 2mm craft foam. Just meant to be a super fun cosplay! My friends and I also did this super fun event where we went to a go-kart place and filmed a Mario Kart video with a whole bunch of Mario characters! Check the video out here!
Cost: $40
Designed by: Myself
Created: March 2014
Work time: 3 Days
Status: Retired
Worn at: Anime Mid-Atlantic 2014, Tekko 2014, Replay FX 2015
Photographers: Yenra Photography , Cosplay Kitchen
Series: Design inspired by Midna from The Legend of Zelda: Twilight Princess
Costume Creation: The bunny suit pattern was a pattern I created from scratch using one of my old dance leotards as a base pattern and modified it to lace up in the back. The bodysuit fabric is a velvet with custom made light blue sheer bias. The skirt is a sheer black top sewed into a sheer blue fabric underside with airbrushed Midna details (from the cape design from her human form). The gloves were the black velvet fabric from the bodice, a self made pattern as well. The belt it 2mm foam based covered in black worbla. Leggings were made with a simple gray and black spandex fabric. Ears were the leftover black velvet from the bodice and the blue sheer from the bias and skirt with wiring inside for structure and clipped into the wig. the anklet and hairpiece are from the original Twili Princess Midna cosplay that is just 2mm foam. Shoes were basic heels using leather paint blue with a touch of glow in the dark paint as well for an added Twilight glow!
Cost: $70 (including wig and contacts)
Designed by: Ely Renae
Created: February 2016
Work time: 4 days
Status: Retired
Worn at: MAGfest 2016
Photographers: Alexandra Lee Photography, Yenra Photography, Eurobeat Kasumi Photography
Series: Fire Emblem Fates: Conquest
Costume Creation: All of the purple on the costume (the cape, gloves, top of hip pieces, and thigh pieces) is a 4-way stretch knit fabric. The cape and the loin clothes have bias tape I custom created specifically for added detail. The rest of the costume (chestpiece individual pieces, gloves pieces, underwear, thighs, and chin armor) is covered in regular double wide gold bias tape, about 21 yards throughout the whole costume. The chestpiece is sectioned into 3 parts. The top is a regular bra i had and stitched in by hand a pyramid fancy bias for along the top line edge. The middle section were 12 individual triangle pieces, 3 mm craft foam covered in worbla, layered in 4 layers of gesso, sanded, painted, then glued gold bias individually into each piece and the last step was simply gluing all of the pieces together. The bottom section is 6mm black foam glued around the bottom edge. The chestpiece laces up in the back to act as a corset. The strap is a nylon base covered in a black lining fabric with single wider red bias tape for the straps. The top is a 6mm craft foam clip I made and pinned in to the Cape part of the costume. The hip pieces are also 6mm craft foam, coated in wood glue for sturdiness. The thigh and shin armor pieces are actually 2mm craft foam used as interfacing and I machine stitched the fabric overtop. The reason I went this route is because Camilla's leg armor doesn't really come across as full armor. So I wanted to do something that was more of an extra cushion for armor rather than the same armored look of the chestpiece. The knee armor is 6mm craft foam covered in plastidip since the knee is more mobile and needs more flexibility. The wig headpiece is just molded from black worbla and I definitely want to remake it soon since it was rushedly made in like 15 minutes. X,D
The axe prop is a 2 inch diameter wooden dowel rod with the actual axe being 2 inch insulation foam covered in black worbla and simple as that! <3
Cost: $95 (not including Wig and contacts)
Created: July 2016
Work time: 1 month
Status: Retired
Worn at: Replay FX 2016, Otakuthon 2016, MAGfest 2017, Katsucon 2017
Photographers: Katya Perin Photography, Eurobeat Kasumi Photography, Theorem Productions, Yenra Photography
Series: Macross Frontier
Costume Creation: The shirt I created using a light green double sheered nylon fabric and the dark green top and bottom edges are a dark green 4 way stretch knit fabric. The wig was the same one styled in my Diamond Crevasse dress Sheryl outfit. the boots were bought and I used a fabric metallic silver paint to give a sheer unique, shine look.
Cost: $60 including wigs and contacts
Created: April 2017
Work time: 1 day
Status: Active
Worn at: Tekko 2017
Photographers: Yenra Photography
Series: Crash Bandicoot
Costume Creation: I just bought the overalls, shoes and shirt for this one, it was meant to be a cute, fun, closet cosplay! The ears where made from an orange long fur fabric and the flower was made with 3mm craft foam and clipped into the hair. Airbrushing was done with Chicago ProAiir Hybrid Airbrush bodypaint.
Cost: $40
Created: January 2015
Work time: Half a day
Status: Retired
Worn at: MAGfest 2015, Tekko 2015
Photographers: Cyberhead Designs, Others are unknown D,x
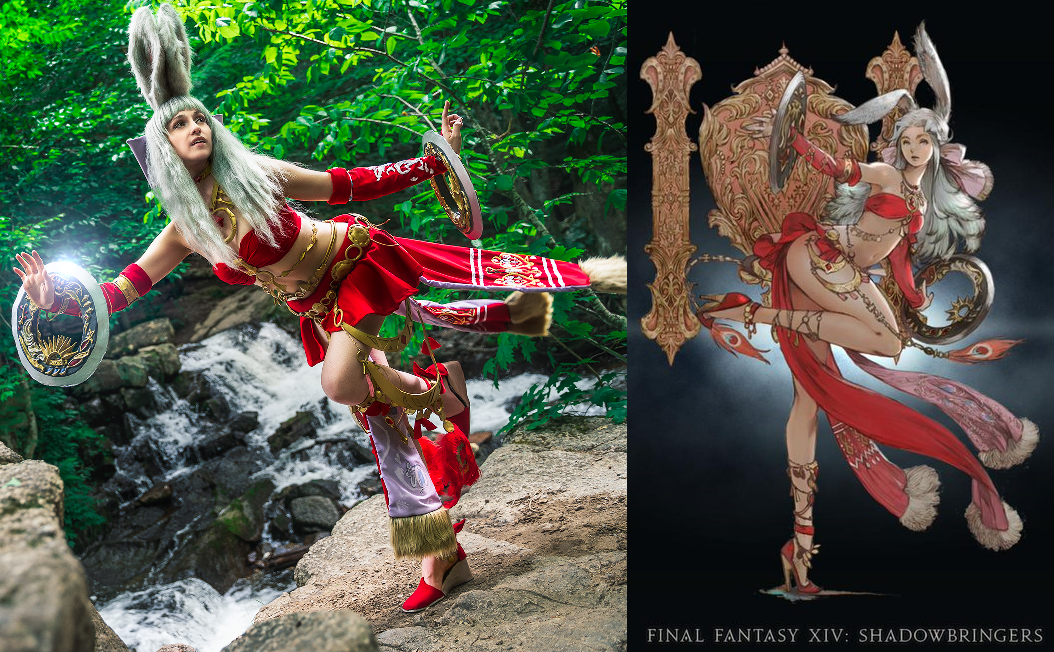
Series: Final Fantasy XIV
Costume Creation: When this job was first announce at JP Fan Fest in 2019 I immediately starting working on patterning out the cosplay that night! I began with the Embroidery that is on the 3 skirt panels. It was my first time ever doing hand embroidery and took approximately 200 hours and 3 solid weeks of work just on that step. Then I moved on to the last bit of embroidery that I noticed was on one of the arms. The underside of the skirt is a fabric painted design.
For all of the jewelry I knew I needed a mix of different methods to accomplish secure and good looks. I knew I would be moving a lot in this cosplay and tried my best to make every single tiny joint as stable as possible. For most of the jewelry I sculpted them by hand with Model Magic, made molds of them, and then cast as many pieces as I could with Resin. I tried to focus on resin casting the biggest pieces and also some of the smaller joint pieces because I needed them to be extremely strong and unbreakable. Once I ran out of resin, I casted the remaining jewelry using hot glue. They end up looking the exact same after painting but some are more stable than others. The side half circles, the necklaces, and the other arm (non-embroidered) jewelry are all craft foam covered in Plastidip for flexibility and then painted gold like the rest. To attach things like the belt together, I made a strip of craft foam and piece by piece, glued on each piece of jewelry until it was one long big strand as intended for the design. To attach other pieces together, I used chain links so the cosplay had room to move and flow freely while I walked and danced to flow more naturally.
The shoes were completely cut up from the base shoes I bought from the thrift store for cheap, covered in the red fabric, and created a fake looking wedge heal for the outer edge since I didn’t buy them as a wedge.
The chakrams are 1” Pink insulation foam, cut, sanded, scultped Model Magic, glued on all sides, 3 layers of wood glue for sturdiness, and painted to finish.
For some added detail and knowing I didn’t spend too much on the cosplay so far, I bought specialty chains so that all of the gold chain used on the cosplay wasn’t all the same. There are 4 different kinds of chains added as details on the back especially that add more to the cosplay and variety.
The wig is Stevie Classic Light Grey from Arda Wigs
Cost: $90
Created: April 2019
Work time: 2 months
Status: Active
Worn at: Yeticon 2019
Series: Macross Frontier
Costume Creation: This was a borrowed costume from a friend! The wig was styled by me. It was a light blonde wig that i painted in light pink highlights with slightly watered down acrylic paints. I constantly brushed through the paint with a fine comb so that the paint never became too chunky in the wig and looked smooth and part of the hair.
Cost: Wig was only $20, the rest was given.
Created: April 2017
Work time: Wig took 6 hours to style and paint
Status: Retired
Worn at: Tekko 2017
Photographers: Yenra Photography
Series: Fairy Tail
Costume Creation: The chestpiece, neck piece, and earrings were made out of worbla. The rest of the yellow parts of the costume as well as the black hair pieces are all sculpted out of craft foam. The red fabric I used was a red sparkly stretch velvet and I decided that the red armor parts of the body should also be covered in this fabric. So I took artistic liberty and i ended up really liking how it looked! Everything that I had to sew was hand sewn to make sure it blended better than what a machine could do. The sword was sculpted out of pink insulation foam and coated in 4 layers of wood glue with 6mm craft foam detailing.
Cost: $95 (including wig and contacts)
Created: June 2015
Work time: 3 weeks
Status: Retired
Worn at: Replay FX 2015, Wizard World 2015
Photographers: Sara Lynn Photography
Series: Persona 5: Dancing in Starlight
Costume Creation: I bought the base outfit, shoes, and wig from AliExpress and made the headphones from scratch. For the headphones I got a base black headband and built over it for craft foam for the headphone shape. For the stockings I bought tan tights and sewed them together so I wouldn’t have problems with them slipping down while dancing.
Cost: $100
Created: January 2021
Work time: 8 hours
Status: Active
Worn at: None Yet
Photographer: Erik Parades Photography
Series: Persona 5
Costume Creation: I bought the cosplay off of AliExpress! Everything else I already owned for it which was super nice <3
Cost: $40
Created: September 2020
Status: Active
Worn at: Conventions in 2020 LUL
Photographers: Erik Parades Photography
Series: Persona 5: Dancing in Starlight
Costume Creation: I commissioned the shirt, choker, and [heels] shoes from a private seller (I’m so sorry I do not remember the site I commissioned it from!!). The wig is bought from AliExpress! I made the headpiece, and gloves myself and also sewed a mini tutu to fluff the skirt up a a little for a more “Ballerina” look! The ballet shoes were actually my old ancient pair from my dancing days. They were about 12 years old so I just decided it was time to sacrifice them! I dyed them black and then sewed black ribbons into them! And now they are filled with holes from doing ballet on concrete, but they fulfilled their goal at this point <3
Cost: $80
Created: October 2021
Work time: 4 hours
Status: Active
Worn at: None Yet
Photographer: Erik Parades Photography
Series: Fairy Tail
Costume Creation: THIS WAS MY FIRST COSPLAY EVER. DONT JUDGE LOL. This was before the era of Worbla, so the only thermoplastic known to man and crafters was Styrene. So the armor and elbow pieces is made out of styrene with 6mm craft foam lining the whole inside.
Cost: $50
Created: January 2012
Work time: 6 months
Status: Retired
Worn at: Tekkoshocon 2012
Photographers: Unknown
Series: Nightmare Before Christmas
Costume Creation: This was another closet cosplay I did! The gloves, blouse, purse and gloves were thrifted. I added on the tailcoat on the bottom of the blazer, and made the leggings from scratch with black spandex. The longest part was painting on the white lines on the entire costume! The bow tie and Zero's head on the purse are molded out of leftover worbla pieces.
Cost: $70 (including wig and contacts)
Created: March 2016
Work time: 3 days
Status: Retired
Worn at: Tekko 2016
Photographers: Sara Lynn Photography, Yenra Photgraphy
Series: Persona 5: Dancing in Starlight
Costume Creation: I bought the base outfit, shoes, and wig from AliExpress and made the headphones, gloves, and pants from scratch. I sewed the pants myself, but I bought the fabric pattern from Spoonflower in a Lyrca fabric so they would be super stretchy. For the headphones, I didn’t have them for my initial performance as the headphones cut into the neck while dancing. However, I found a way to make them 100% out of craft foam a year later and then attach them directly onto the Shujin jacket.
Cost: $90
Created: February 2021
Work time: 7 hours
Status: Active
Worn at: None Yet
Photographer: Erik Parades Photography
Series: Final Fantasy 13
Costume Creation: This was made with the help of Tom from Cosplay Kitchen! The jacket was made with a thick brown nylon inner lining with the top being a polyster off-white fabric (can't remember exactly what it was). Buckles on it were either casted or I created a mold and used hotglue as the material. The shoulder piece was crafted from 3mm craft foam, 3 layers of woog glue to coat and then I used El Wire to make it light up. The gloves are a 2 way stretch knit fabric with the knuckles are out of 2mm craft foam with wood glue. The straps /belts throughout the costume are just basic pleather. The skirt is AN AMAZING copper stretch pleather I came across. Undershirt is a ribbed brown 2 way stretch knit fabric.
Gunblade was created and designed by my brother. It DOES transform, you can see that in the video here. Note: this is still a work in progress! A new design is being made so it transforms 100% accurate to the game. So this cosplay will be revamped as soon as the next Gunblade design comes in. It is entirely 3D printed or laser cut. My brother designed and assembled it, and I sanded and painted it.
Cost: $95 (including wig and contacts)
Created: August 2014
Work time: 3 weeks
Status: Re-making pieces for next Gunblade prototype
Worn at: Otakon 2014, Festivalcon 2014
Photographers: Cosplay Kitchen
Series: Final Fantasy XIII-2
Costume Creation: Pretty much the whole costume is made out of 6mm or 3 mm craft foam! Then the purple-ish straps throughout the whole costume are vinyl. The shoes were spray painted (LUL don't do this, I was a nube and they will only last not even one wear before cracking. Use leather paint, don't be stupid noob me). At the time I coated my craft foam in 3 layers of Elmer's glue, again, I was a noob DONT DO THIS. Now my method of madness is to coat in wood glue. You don't wanna know what happens long-term to armor thats coated in Elmer's glue, so just don't make the mistakes that I made. The leotard was just bought online because at the time I didn't know how to sew. The side tail feather thing was made hand-sewing 80 individual pure white turkey feathers onto a netting fabric.... this alone took about 3 straight days of hand-sewing.
The sword had two versions, both created with the same materials and methods between foam boards, styrene sheet bases and then craft foam detailing with acrylic paints!
The shield was a foam board base with insulation spray foam carved out to be a nice rounded shape, covered in paper machay for smoothness, then craft foam detailing.
Cost: $80 (including wig and contacts)
Created: March 2013
Work time: 1 year (LUL this was my second cospolay ever so I was still learning)
Status: Retired
Worn at: Tekkoshocon 2014, Colossalcon 2014, Katsucon 2014
Photographers: Felix Wong Photography, Cosplay Kitchen, Charismatic Moments
Series: Final Fantasy 13: Lightning Returns
Costume Creation: The chestpiece, hip piece, shoulder piece, arm armor pieces and knee guards are 6mm and 3mm craft foam covered in plasti-dip. The Shoulders specifically were done two completely different ways for painting. The arm side is just black plastidip, and the top scaled layer is individually cut out and glued on, then plasti-dip for the flexibility and then a glass black coating for that extra different look since the design also had the different textures in the shoulders. The leotard was bought with an open back and modified cut along the sides. The legs are almost like chaps, the inside is a pleather sewn into a dark red knit fabric, same was done for the boots of the costume. The cape, collar, and leg flaps are a combo of the white thick linen fabric and the inner being the red knit fabric put together.
The sword is made with 4 layers of foam board with the blade being out of 2mm craft foam, with wood glue for sturdiness. The swords ARE AVAILABLE FOR PURCHASE on my store here. The shield had a styrene based with foam for the detailing all on top! then a had criss crossed straps on the inside to put on and off my arm with ease.
Cost: $90 (not including wig and contacts)
Created: March 2014
Work time: 1.5 months
Status: Retired
Worn at: Tekko 2014, Anime Mid Atlantic 2014, Otakon 2014
Photographers: Cozpho Photography, Cosplay Kitchen, Yenra Photography, Unununium
Series: Persona 5: Dancing in Starlight
Costume Creation: I bought the wig and shoes from AliExpress, the skirt I already had from my Ann cosplay from AliExpress as well. The belt and chain were bought off of a Halloween vendor. The garters and leggings were from Amazon. The shirt I made, then used black fabric paint for all the spots, cut open the slits, and attached the safety pins. As an additional step, I didn’t want the safety pins to slide up and down everywhere, so I glued them all in place on the underside of the shirt. 10/10 would recommend. The red scarf on the arm I also made with a wire in inside so it would hold a nice shape sticking out, and I sewed it directly onto the shirt as well so it wouldn’t shift around while I danced! I made the choker, and the gloves myself as well.
Cost: $50
Created: May 2021
Work time: 10 hours
Status: Active
Worn at: Otakuthon 2022
Photographer: Erik Parades Photography
Series: Persona 5
Costume Creation: This is just a kigurumi version of Morgana that I made myself. It’s made out of Anti-Pill Fleece and is extremely soft and warm but also breathable.
Cost: $30
Created: December 2020
Work time: 6 hours
Status: Active
Worn at: Yeticon 2021
Photographer: Erik Parades Photography
Series: Persona 4
Costume Creation: This cosplay I got commissioned here. I adjusted the hat since the brim was too long for my liking. I also styled the wig. I spent more on this cosplay to get a nice commission since I actually wanted to be able to wear the jacket during the winter time. Cosplays used IRL are the best.
Cost: $175
Created: September 2020
Status: Active
Worn at: Conventions in 2020 LUL
Photographers: Erik Parades Photography
Series: Pokemon
Costume Creation: Costume was made from scratch using a shiny high gloss PVC stretch fabric. The tail in the back has a 8mm low density piece of foam inserted to add some fluff. The gloves, and water socks were bought on Amazon!
This cosplay was part of a full group of all of the water starter pokemon in every gen!
Cost: $80 (including wig and contacts)
Designed by: Jazzy Cosplay
Created: August 2017
Work time: 2 days
Status: Retired
Worn at: Colossalcon East 2017
Photographers: Yenra Photography
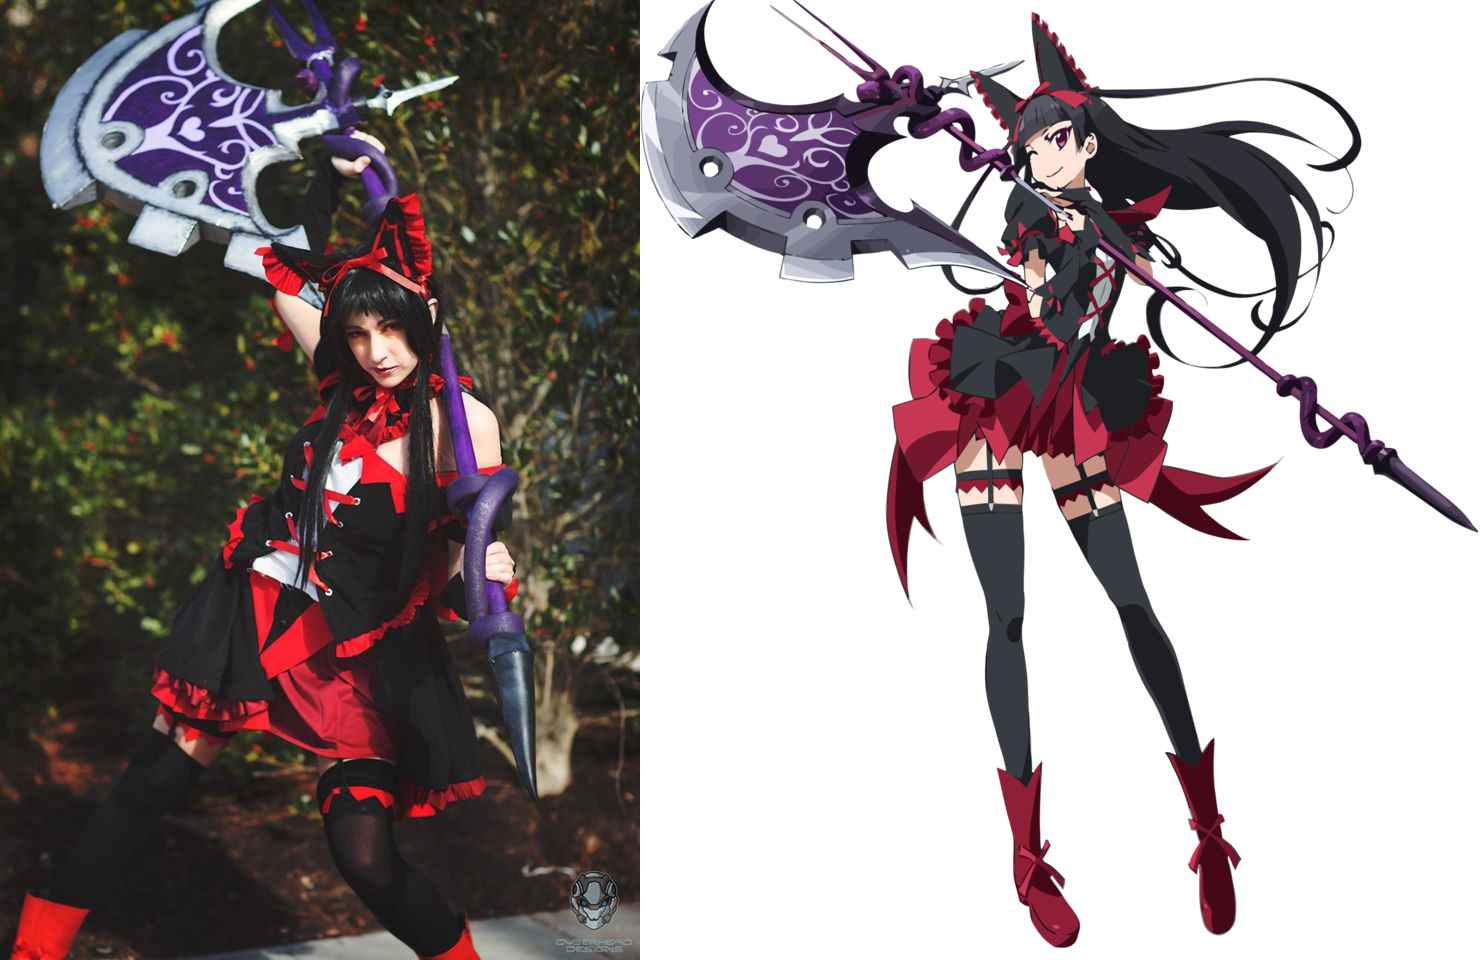
Series: GATE
Costume Creation: The fabric for the shirt, skirt, and gloves were a thick black velvet fabric and the red was a basic 2 way stretch polyester knit fabric. I sewed horsehair into the skirt to give it the extra fluff and curl along the inside for the added lolita look. The headband had wiring in the easrs and the red design on them was embroidered on. The ruffles throughout the cosplay were done with a ruffle foot.
The axe prop was a base 2" insulation foam, with 2 4 foot 1 inch diameter wooden dowel rods that screwed together in the middle so it broke apart. The snake around the axe, is an inch diameter piping insulation foam.
Cost: $80 (including wig and contacts)
Created: January 2016
Work time: 9 days
Status: Retired
Worn at: Katsucon 2016, MAGfest 2016, Otakuthon 2016
Photographers: Desmond Gayle Photography, Cyberhead Designs, Yenra Photography, CB Visuals, Theorem Productions (or main site here)
Series: Persona 5: Dancing in Starlight
Costume Creation: I bought the wig and (original) shujin pants from AliExpress. The base of the shoes were bought from SHEIN. The belts were bought off Amazon. I bought the bracelets from a thrift shop. The new Shujin pants I bought the fabric pattern in Lycra off of a seller on Spoonflower and then sewed them myself. I made the scarf and painted it along with the shoes as well.
Cost: $60
Created: September 2021
Work time: 6 hours
Status: Active
Worn at: No conventions yet
Photographer: Erik Parades Photography
Series: Kantai Collection
Costume Creation: This was a cosplay given to me for the most part! I made the skirt and shoes from scratch and styled the wig. The blue skirt is a 2 way stretch nylon knit fabric with an anchor button for added fitting decor. The shoes were fabric painted, added foam details and spray water-sealed (even thought it didn't end up holding to the water, it was a first attempt LOL).
Cost: $75 including wig and contacts
Created: July 2016
Work time: 3 days
Status: Active
Worn at: Otakuthon 2016, Colossalcon East 2017
Photographers: Yenra Photography , Obscura Vista
Series: The Legend of Zelda: Twilight Princess
Costume Creation: This cosplay in particular was a LOT of first time's for me in a lot of areas. The headpiece was the first thing I ever made and sculpted out of worbla. The bodysuit is a 4 way stretch lycra fabric in gray and black. The cape is a regular Black thick polyester lining with a sheer blue lining on the inside. The cape was then airbrushed for all of the detailing. The skirt is also made out of the same fabric as the cape and has the same airbrushed details. The top silver detailings on the cape and skirt were created with a stencil and then fabric spray paint. The belt, hair piece, and anklet are made out of craft foam. The bodypaint was airbrushed on using ProAiir Hybrid Bodypaint.
Cost: $90 (not including contacts)
Created: December 2014
Work time: month and a half
Status: Retired
Worn at: MAGfest 2015, Katsucon 2015, Tekko 2015
Photographers: Vannak Photography, Cyberhead Designs, XWickedGames, Sara Lynn Photography, Yenra Photography
Series: Fairy Tail
Costume Creation: The main dress is a modified Marilyn Monroe style dress so that it was cut and open in the front. The belt, gloves, and collar the red fabric is a basic linen fabric. The leggings were a spandex white fabric, with ribbed gold spandex fabric for the top and I did a black embroidery stitch along the outside to define the lines more from a distance.
The wig was a TRIP. So this wig is 2 wigs sewn together because I wanted it to be SUPER voluminous. The bun was made with some leftover shorter wefts from the one wig and a half of a styrofoam ball and then spray glued those wefts over it. Then I attached a rare earth magnet to the bottom and into the wig so the bun could easily come apart if need be. The wings on the bun were just 2mm craft foam, worbla and white acrylic paint.
The swords is what everyone wants to know about! My brother helped me design how it would rig up since I wanted each sword to be easily detachable. The base is PVS and the harness was around my waste under the dress and the red waste belt so you couldn't see it. The yellow pieces on the back and the pieces that screwed into the PVC pipe were 3D printed pieces that he designed and ordered. It was a twist and lock method so that all i had to do was lift the sword of slightly for them to come off. The swords themselves were each made with 2 in. insulation foam.
Cost: $80 (including contacts but NOT wig)
Created: November 2015
Work time: 2 and a half weeks
Status: Active
Photographers: VideoGameStupid, Paul Williams Photography, Yenra Photography
Series: Persona 5: Dancing in Starlight
Costume Creation: PHEW THIS COSPLAY…. Okay, I bought the base jacket and button up shirt. I also bought the wig, white belt and shoes. The pants are stretch dress pants I already owned. For the shirt, I wasn’t satisfied with the color of the button up, so I dyed it more purple leaning since it was a royal blue initially. The gloves I made myself. For the jacket… I hand sculpted each individual spike on the jacket using Super Sculpey, there are around 250. I used a leather hole punch where each spike was going to be located on the leather jacket. I then cut out 250 1cmx1cm cardboard squares to act as a sandwich between the spike and the underside of the jacket. This way, the glue would adhere very strongly and spikes wouldn’t fall off as easily.
Cost: $70
Created: September 2021
Work time: 30 hours
Status: Active
Worn at: None Yet
Photographers: Erik Parades Photography